by WalkerRiley
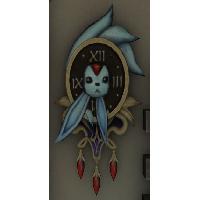
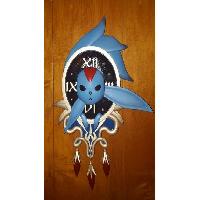
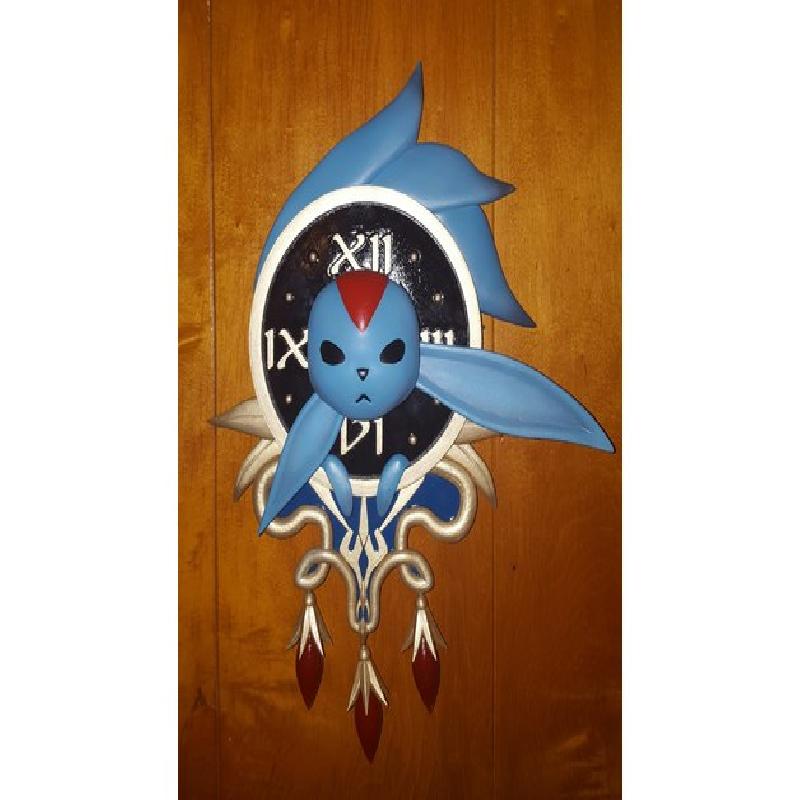
Carbuncle wall clock from Final Fantasy XIV: A Realm Reborn. Many parts and a long print ahead, along with some extra legwork to get it working.
For whatever reason, no matter how I rotate the parts, some of them refuse to lay down after exporting the STLs. Pay attention and use your best judgement for the rotation on your printer bed.
Note: The large ear (minute hand) is actually TOO HEAVY for any clock movement I tried. I tried everything I could to counter the weight, but each time it just overpowered the movement. I used the print as a template to make a wood ear from balsa. If anyone can remix this to work, let me know.
Printer:
Monoselect Plus
Rafts:
Yes
Supports:
Yes
Resolution:
.1mm
Infill:
15%
Filament: Your Choice PLA
Notes:
This was designed to fit on a 200mm x 200mm x 180mm bed. For the most part you should only need to use a brim but I highly recommend a raft when you print the weights. The clock body, tails, leaves, weight leaves and shield WILL need supports. The weights, head, and ears should not need supports but use your best judgement.
I HIGHLY suggest enabling retraction and lowering your print speed. When printing the weights, make sure to set a minimum print time per layer so the spheres have time to cool before moving to the next layer.
Use your best judgement for infill. You shouldn't need much strength or rigidity with this print.
.1mm layer height is fine for everything. I used .15mm when printing the clock body to speed up printing. Most parts are a few hours print time, the clock body will take about 24 hours at a print speed of 50 mm/s
Sanding & Cleanup
Everyone's most favorite part.
You do not need to sand, but it will make the parts look infinitely better. If you are blessed enough to have access to a printer that will easily print ABS, you already know what you need to do. For the rest of us, sandpaper and filler.
I start off with 80 grit sand paper to clean off the surface as best I can. Sand across the filament lines to drop the peaks down.
For filler, I stand by Elmer's Interior Wood Filler. It's cheap, dries fast, easy to clean, and does the job. For this print I take a glob and spread it generously across the surface to fill all the scratches, crevices, etc. You can, if you'd like, take a paint brush with a little bit of water and smooth it out.
Take your 80 grit to this once dried.
I then take a glob of the wood filler and mix it with enough water to make it the consistency of somewhere between milk and cheap craft acrylic paint, and then spread that on to fill in any smaller scratches. Sand with 80 grit, then 120, then 220. If you want to get really smooth, keep going with 400, 600, 1200...but I only did up to 400.
Priming
I use grey spray sandable primer & filler in one. The spray I use dries in about fifteen minutes and can be painted. I will throw two coats on, a few minutes apart, then inspect after drying. At this point you can use the water/filler trick to fix any minor imperfections that still show up. Just use 220 at this point. Hit it with another coat of primer, wait to dry, and inspect. If you still are not satisfied, you may want to consider using a different filling medium.
Masking and Painting
Artsy people may argue this. They may not.
You can never have more than enough masking. Mask EVERYTHING you don't want to get paint on. I personally was an idjit and started with the gold on the clock and shield when I should have started with black/blue and masked over that. But it's still a lot of masking/blue tape.
Painting is up to you. I personally airbrush as much as I can and only brush paint where I can't get enough masking down to cover for airbrushing.
All gold parts and the clock itself was finished with a standard aerosol crystal clear glossy finish and all the carby parts with a matte clear finish.
Clock Parts
I used a high torque extended clock movement part #MVT718HT from https://www.clockparts.com. The parts above are designed to fit this particular movement. Remix it to fit yours.
You WILL need to pick up a el cheapo $3 10" dia. wall clock from Walmart or where ever to cannibalize a second hand. That's where you'll get the "cap" that we affix to the carby head. You can save the rest for a future project and it's a really cheap piece of round glass which is useful for paint palletes or any number of other things.
Blender for beginners
I've mentioned in the past how much I hate ACAD's 3D modeling setup. I've been trying to get into Blender for awhile now but never had any real need to. Running tutorials is never fun and the Blender community is rather exclusive and really do not enjoy helping new folks out, in my experience.
Doing something like this is a great way to learn the basics of the Object, Edit, and Sculpt tools as well as learning how to switch between views, tools, etc.
But I stuck it out and think I did a fairly decent job, and learned a bit as well.