by KohlHertz
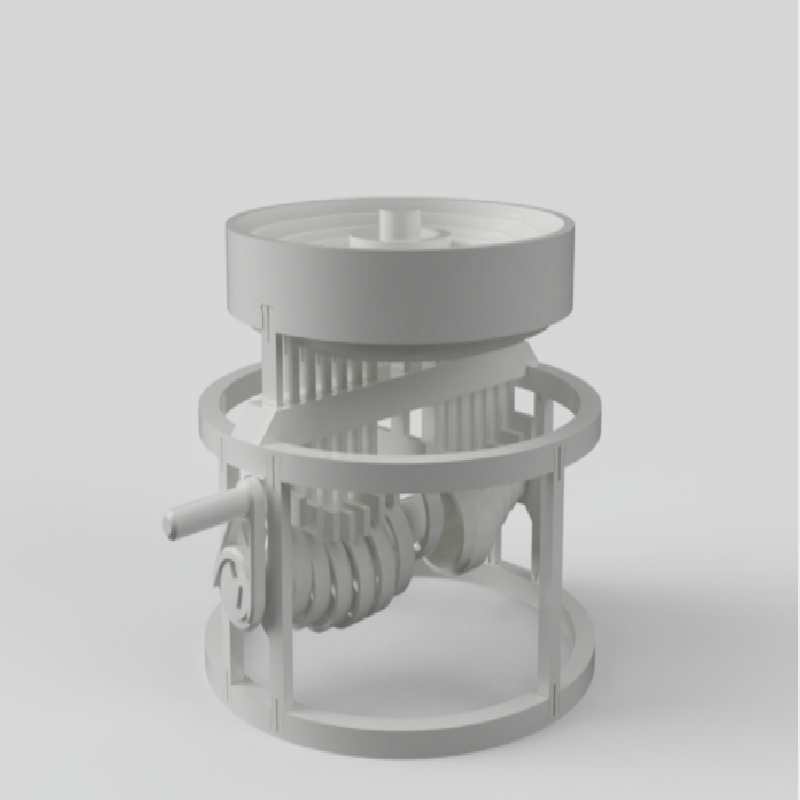
This mesmerizing palm sized kinetic sculpture mimics the motion of a drop of water hitting a still pool. Standing at only 8cm tall and with a diameter of only 10 cm it is a perfect desktop toy.
There are two main assemblies; the upper assembly consists of the ripples, push rods and push rod guide, and the lower assembly which consists of the crank, cams and the frame. In total these two main assemblies consist of 51 pieces, all held together without fasteners. As daunting as 51 pieces may seem, the satisfaction of completing this print is well worth the effort.
Print Settings
Printer brand:
Creality
Printer:
Ender 3
Rafts:
No
Supports:
No
Resolution:
0.2 mm
Notes:
####Orientation of the models is key to having a successful and fully operational Ripple. A few parts need to have orientations that may seem odd; the FrameSides, FrameBack and FrameFront need to be printed vertically to ensure proper attachment to the TopFrame and BottomFrame. This is not true for the PushRods, which can be printed on their sides. Other parts, like the Cam1-8, CamSpacer1-2, and PushRodGuide have a small chamfer on one side that must be placed down on the build plate to ensure a smooth running mechanism.
Post-Printing
Due to the tight tolerances of the model, a perfectly smooth running machine is achievable on the first print, but minor adjustments may be needed to correct for printing errors. In particular, the PushRods are often flanged at the bottom and need to be sanded flat to ensure a loose enough fit for a smooth Ripple. #–Assembly– ###Upper Assembly Grab the Ripples, PushRods (x13) and the PushRodGuide. Start in the center of the PushRodGuide threading through a PushRod. Snap the smallest ripple into place. ####IMPORTANT: Every snap connection in this assembly has an orientation; the PushRods have a snap connector at the top, the side that should be pushed into the Ripple is the side with a bulge. Continue outward, making sure to thread the PushRods in the correct orientation before you snap them in place. Once you have snapped all 8 Ripples into place, ensure that all PushRods move freely and sand any that stick. ###Lower Assembly Start by pushing the short end of the CranksRod through the hole with the FrameFront. Place the CrankHandle on the square end of the CrankShaft, and fix it in place with the CrankClip. Gather the Cams, and order slide them on 1-7, with the build plate side toward the FrameFront. After the first 7 cams are in place, slide on the larger CamSpacer1, then Cam8, another CamSpacer1 then Cams7-1 in descending order in the same orientation as before. Finally, after all 15 Cams and 2 of the CamSpacer1s are on slide the CamSpacer2 onto the CrankShaft to finish the Cam assembly. To assemble the Frame onto the Cam assembly, attach the FrameBottom and FrameTop to the FrameFront. Then attach the FrameBack, making sure that the CrankShaft is inserted in the hole. Finally, attach the two FrameSides to the now completed lower assembly. ###One Last Step Now to bring the Upper and Lower assemblies together, line up the pins on the bottom of the PushRodGuide with the holes in the FrameTop. Carefully snap these into place and make sure everything is working properly. #enjoy!