by Winslow
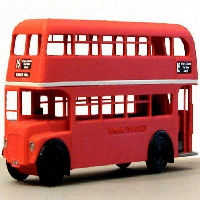
The model is based upon the popular Routemaster bus operated by London Transport from 1956 to 2005 and now viewed as a British cultural icon. A new, redesigned version of the Routemaster entered service in 2012.
YOU WILL NEED TO PRINT:
2 axles
4 wheels
2 front mudguards
2 rear mudguards
2 headlights
and one copy of all the other parts.
I used ‘True Red’, ‘True Black’, ‘Cool Grey’ and ‘Warm Grey’ filaments. (See estimated printing times below.)
On my Makerbot Replicator+ I printed several pieces at the same time, (see estimated printing times below.) at the default settings of 10% infill and a layer height of 0.2mm. using rafts but no supports. All parts should be printed in the orientation shown.
The assembled parts can be fixed permanently into position with a few drops of Super Glue.
Route signs and number plates are printed onto thin card stock, cut out and glued into position. The signs I used are attached below for you to print out.
ASSEMBLING THE MODEL
Trim off any errant threads of filament.
Glue the ‘Trim’ to the bottom of the ‘Top deck’ making sure it fits flush at the sides all round.
Fix the ‘Top floor seats’ into the top deck and trim. The bottom should fit flush with the bottom of the trim.
Fix the ‘Lower floor seats’ into the ‘Lower deck’. Make sure that the grab pole at the back fits into its socket in the floor.
Fix the “Stairs’ into position, inserting it from the top.
Glue the assembled top deck to the assembled bottom deck.
Fix the ‘Driving wheel’ into its socket in front of the ‘Driver’s seat’. (Turn it so that it tilts slightly towards the driver.)
Fix the (slightly wider) ‘Front mudguards’ into position, making sure they are pushed right into the grooves designed for them under the driver’s cabin. (Note that the rear ends of the mudguards taper, whereas the front ends are cut square, and that the front ends fit flush, but the tapering rear ends extend a little below the sides of the bus.)
Glue the two headlights into their sockets. (A pair of tweezers may be useful.)
Glue one wheel onto an axle, push the axle through the hole beneath the driver’s cabin and glue the other end into another wheel, making sure you don’t get glue onto the side of the axle, which would prevent them from turning.
Glue the (slightly narrower) ‘Rear mudguards’ into position beneath the lower deck. The note about the correct alignment of mudguards (above) also applies to the rear mudguards.
Fix the rear wheels and axle into position in the same way as the front wheels.
Glue the assembled driver’s cabin into position at the front of the bus, fitting it flush with the trim at front and sides.
Cut out the printed route signs and number plates and glue them into position.
APPROXIMATE DIMENSIONS OF MODEL
Length - 16cms
Width - 4.5cms
Height - 7cms
ESTIMATED PRINTING TIMES
Lower deck - 2h. 34m. (True Red filament)
Top deck - 2h. 21m. (True Red filament)
Driver’s cabin - 16m. (True Red filament)
Trim - 39m. (Warm Grey filament)
Lower floor seats - 1h. 39m. (Cool Grey filament)
Top floor seats - 1h. 33m. (Cool Grey filament)
Stairs - 23m. (Cool Grey filament)
Driver’s seat & headlights - 16m. (Cool Grey filament)
Mudguards & driving wheel - 21m. (True Black filament)
Wheels & axles - 56m. (True Black filament)
See more of my designs athttps://www.thingiverse.com/Winslow/designs
Custom Section