by Mint
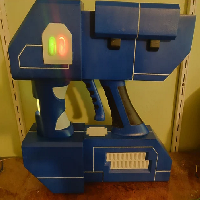
I modified the model to add a few things:
Holes for alignment pins since the chopped model has no alignment registration inherently
Holes for LEDs
Internal voids to run wiring for LEDs
A removable top cover for an insert to hold a switch and a 18650 cell
Recesses for magnets to hold the cover on
Amazon links for materials:
Pins:https://www.amazon.com/gp/product/B07M63L11L
Cell Holder:https://www.amazon.com/gp/product/B07CWKGZXW
Magnets:https://www.amazon.com/gp/product/B07873ZCY4
Resistor:https://www.amazon.com/gp/product/B0185FJ6RY
Switch:https://www.amazon.com/dp/B08276JLGN
Links to useful items:
Spot Filler:https://www.amazon.com/gp/product/B004BZOTQQ
Great for filling in gaps and inconsistencies in prints
Tamiya masking tape:https://www.amazon.com/gp/product/B00J3TLZQC
Thin masking tape useful for getting close to fine details since its easier to manipulate
5 minute epoxy:https://www.amazon.com/gp/product/B01M7VD07W
Good for rapidly assembling your parts and offers a very secure bond. A little goes a long way. Just apply, clamp and in 5-15 mins you can unclamp and move on.
Sandpaper:https://www.amazon.com/gp/product/B07D8QLN1N
This sandpaper pack has all the grits you are going to need before priming.
Sandable Filler primer:https://www.amazon.com/Rust-Oleum-Automotive-260510-12-Ounce-Sandable/dp/B006ZLQ4HQ
This stuff is great. Spray this on to prime and then sand it back using some high grit sandpaper and it leaves a super smooth surface to paint onto. Fills in small scratches and imperfections pretty well.