by reddadsteve
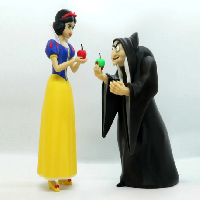
Old Hag, is based on the Evil Queen character from a 19th-century German fairy tale "Snow White".
The Evil Queen goes down the dungeon to her secret room where she practices her dark magic, complete with a pet raven, and in desperation uses her spell-book and cauldron to mix a potion that transforms her into the Old Hag.
No supports are required. If you have the proper filament colors, no painting is needed.
The assembled model is 250mm tall and is in proportion to my Snow White model.
Enjoy!
...........................................................................................................
Print Instructions:
Supports: No
Resolution: .2mm
Infill: 10%
Notes:**
Refer to the notes below for a few helpful printing and assembly instructions.
...........................................................................................................
Building the model
Colors
Black: (Paramount3D PLA - Black)
eye_blacks (contains two pieces)
eyebrow_right
eyebrow_left
mouth
shoe
..
Black: (Paramount3D PLA - Matte Black)
cloak_bottom
cloak_top
sleeve_right
sleeve_left
hood
..
White: (Paramount3D PLA - White)
eye_white_right
eye_white_left
tooth
hair_right
hair_left
..
Dark Red: (Paramount3D PLA - Hannibal Red)
tongue
..
Red: (Hachbox PLA - True Red)
apple_red_bottom
apple_red_eyes (contains two pieces)
apple_red_nose
..
Light Brown: (Paramount3D PLA - Military Khaki)
eye_brown_right
eye_brown_left
..
Dark Brown: (eSUN ABS - Brown)
apple_stem
..
Skin: (Paramount3D PLA - Universal Beige)
head
hand_right
hand_left
..
Grey: (Paramount3D PLA - Battleship Gray)
sleeve_insert_right
sleeve_insert_left
..
Bright Green: (unknown PLA)
apple_green
..
...........................................................................................................
Printing and assembly tips
Printing tips
1-No supports are required.
2-There are some pieces that may need brims or rafts, use your discretion.
I used brims on the tooth and eye_blacks.
I used a raft on the eyebrow_left/right parts after two failures with a brim.
3-The tooth is quite small, so you make want to print a few in case you lose it. Do not be concerned if the part looks a bit deformed at that size and shape.
..
Assembly tips:
1-Take your time gluing the model together and enjoy the process.
2-I used E6000 sticky craft glue to put this model together. The sticky glue allows more time to position the parts than a fast drying superglue. I have 'fat fingers' and a shaky hand, so the sticky glue works out best for me, especially with small pieces.
3-I suggest gluing in the eye_browns before the eye_whites (with the eye_blacks already glued in). The eye_whites have a bit of play and could accidentally be inserted incorrectly. Look carefully at the pictures.
4-The hood is a snap fit into the cloak_top. Press it in firmly.
5-The tooth is quite small. Be sure that the mouth and tongue are already glued in, with the opening for the tooth aligned. I used a sticky toothpick to place the tooth in and nudged it into a position that looked good. There is no exact fir for this part.
6-The apple green has small indents for the thumb and middle finger so that the apple sits high in the hand, with the apple slightly rotated in the hand.
7-Refer to the assembly diagram in the pictures section as well as the uploaded pictures for putting the model together. The model is meant to be glued.
Do not hesitate to ask questions, feedback is essential to making better models.