by rkxone
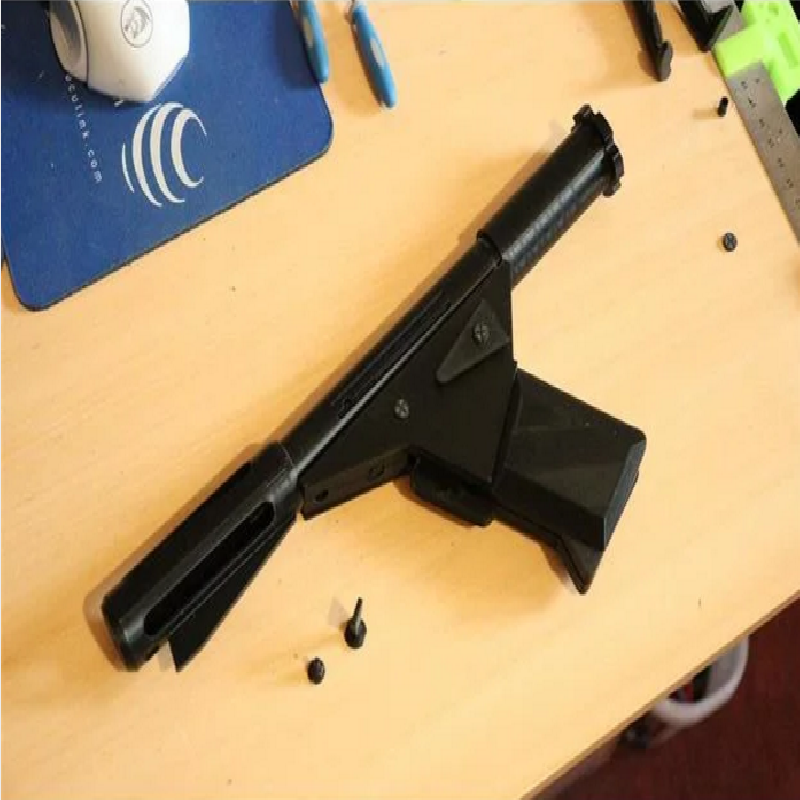
I finally decided I was going to print out a Logan's run Sleep gun :) And again I saw the opportunity to help make it an easier print and fix some minor issues, so here are my mods. I have completed assembly and everything works so this addresses some of my main wants for this awesome model.
I am also going to include the full parts kit here (the originals I used also), so everything you need is in this one thing saving any confusion hopefully.
Okay, so on to the mods
What I wanted to address:
The back barrel cap: the back barrel is threaded but the back cap is not, I have put threads on the back cap now, they are not large, but once you work them in it threads on like a nice tight glove (tip a little force is required here).
The front barrel: Just looking at this made my head hurt in the slicer, so much extra supports, and difficult areas to work with for the supports, so I took it apart, I created a core for the back, I know this takes away from the stop point for the main barrel but that is easily to work around without much effort. so I created an insert for the back that still allows LED electronics to but put in. and I also made the insert multipart to make printing easy without support. The front of the barrel is also multipart, this allows the front barrel to be printed level on the bed with only supports needed for the wedge (I am testing this support setup now to make sure the tops of the inset cut outs work without too much issue with no support)) this also allows the new front cap bevel to be added and removed for access or modification
Other greebles: I will also be making a base for this shortly for display.
The New Parts:
New Back Cap Threaded
This mod puts the threads on the back cap for attachment to the back barrel
used the existing back barrel dropped the XY 2mm to make the new threads with
clearance
This still needs a bit of force to get on, but once set it works beautifully and tight allowing proper access to everything so I am not going to mess with it more right now.
this isn't meant to be perfect it's just meant to work better :)
New front barrel (Inserts, main front barrel and front barrel front)
To make the front barrel an easier print I have split the front barrel into several parts and incorporated a few different elements, I pulled out the inner back section to allow a flat print, this section is now 2 pieces, an inner tube and an outer insert shell to be combined and slid into the main barrel section after print completion, then the front barrel goes around it all
the front tip has been divided to allow the new front end cap to be a one piece addon, the means the front barrel now prints much easier, with just support for the fin (I had not issues printing it this way so I didn't want to really over complicate it)
Screws
Added some Philips head screw blanks for the handle (there will be sanding involved dur to the nature of these) Should be enough and varied enough to fill all the spots how you see fit.
Front Barrel Main
The back of this barrel was cut down 2mm to make a solid smooth top layer then stretched to put more on the main barrel for gluing
build plate support only (fully tested as clean and nice) the part comes out strong but due to the nature of the venting it's not going to be super strong (Nature of the beast)
Front Barrel Adapter
I did not want to redesign the hole main and back barrels so this little spacer goes over the main barrel and then inside the front main barrel, needs a tad sanding for elephants foot but other than that its fits nice and tight.
Front Barrel Cap
This cap just slides into the front and includes the new front profile to match the movie prop
some minor sanding will be needed for a tight fit (this is by design to allow other modifications or disassembly)
I may add a thinner variant here later I will see once I have it all glued up
Front Barrel back inserts
Broken down into 2 parts
the inner cylinder slides into the main insert from the contoured side (judge it how you best want it to look, I put mine flush to the elephant foot :P )
Insert the new 2 piece part into the main barrel, contour side in (fit perfectly)
The fit is best to be able to work on this part for any electronics at a later time depending how you put your gun together, glue any LED to the front rim and run the wires through
Attach the front barrel to the main barrel assembly AFTER installing the insert!! :P
Screw set
Added more rounded screws
Added inset crosses (print as orientated)
As per this type of part there will be a need for much sanding depending how your print came out
Hopefully you found this mod helpful :)