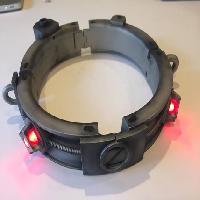
Version 6 is here! I'm in the process of sanding and painting a copy of this version, until then the picture of the finished collar is actually a V2.0 The components are NOT interchangeable with the exception of the badge, and light baskets.
What's new?
For starters, this one is smaller. Designed to fit a 16-17 inch neck. The adjusters can be tweaked to enlarge the diameter, and I will be providing some larger hinges, front latches as well. For now, if you need a larger one, print the V2.0 collar.
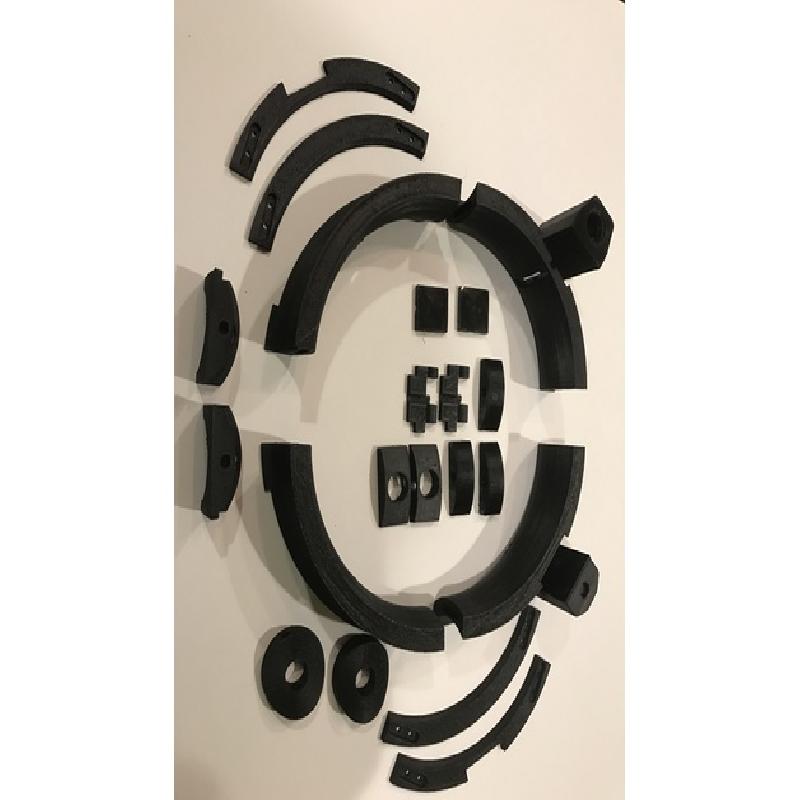
You will notice there are a lot more individual parts. This should help during the finishing stage, making it easier to sand. I will probably post some "Quick Prints" where some parts are combined, I'm not sure it really will save any time though.
The profiles for the Quadrants are closer to the screen used version.
Wire routing is much cleaner.
Redesigned hinge and adjuster pockets
Upper quads have accommodations for real allen head screws
Battery compartment is totally redesigned, and no longer requires a screw for battery removal
I might be a little obsessed with Zombie control collars. If you haven't seen the movie Fido it really is worth a watch!
I made a version of this collar a few years ago before I got my 3D printer. I wanted to see what a 3D version would look like when printed.
If you make one of these feel free to add your input on printability and design.
I may tweak a few parts here and there, other than that this prop is ready to print assemble and wear!
Added battery screw for reference. It is hard to print, you can order the real deal from McMaster Carr.
The Battery compartment has been designed to accommodate a 123A Lithium battery. It lasts many hours, and is readily available. The Battery door and Battery compartment have holes in them so you can use a needle or a pin as a hinge pin.
I used IDE ribbon cable wires for the LEDs. I have included a wiring diagram for the LEDs, The resistors can go on either side of the LED, and there are many places to put them in the model. The parts include conduits for the wire. to power the LED on the side that does not have a battery compartment, pass a wire through the conduit just under the hinge.
K&J Magnetics
12.6mmx5mm Disks from N35 ZD3 Amazingly strong given their size. (4 Required)
Digikey supplied the Resistors and battery components
CF14JT10K0CT-ND 8.3 Ohm 1/4W Resistor (2 Required)
36-5223-ND CONTACT BATT W/TABS POSITVE A/AA (1 Required)
36-5201-ND CONTACT BATT W/TAB NEG SPRG A/AA (1 Required)
SuperbrightLEDS.com
RL5-R3545 2.6V 50MA Clear Red LEDS. (2 required)
Mc Master Carr
Part Number 91390A183 Set Screw (1 Required)
Part Number 91290A073 Alloy Screw (16 Required) Trim off the threads or drill parts.
Conduit
From an LED snake light I found on Amazon http://amzn.com/B003SSAEZ2
Red "Lights"
Acrylic Round Rod, Translucent Red, 1/2" Diameter, 2' Length
https://www.amazon.com/Acrylic-Round-Translucent-Diameter-Length/dp/B00EVBTQ18/ref=sr_1_1?ie=UTF8&qid=1476491970&sr=8-1&keywords=acrylic++rod+red
The battery compartment is in two parts, an upper, and a lowerThis way it can be printed without supports.
he Chain plate although included in the file for reference. I did not print mine on the printer, Instead I took a pice of flat bar steel and glued (Welded actually) a half a link of chain to it. The sides of the collar have places to put magnets in to hold the chain anchor on. This way if anyone pulls too hard on the chain it pops off, protecting you and the prop! I got plastic chain at Lowes, and painted it silver.
Please note, this is NOT a screen accurate model, some liberties were taken, and parts were modified to simplify construction, and printing.
The parts in this model an be printed with minimal/no supports. The rear quadrants have a perforated web at the bottom to aid in bed adhesion, They will need to be cut off.
Printer:
Monoprice Dual
Rafts:
No
Supports:
No
Notes:
Print the adjusters and hinge parts with greater infill for strength.
I use Nitro Stan or Bondo Glazing putty after sanding with 120 grit, then finish sand with 220 and 400. Sanding blocks are included to sand the inside of the badge and the quadrants. 3m makes "3M SandBlaster Ultra Flexible Sanding Sheets" super awesome sandpaper, glue it to the sanding block for a perfect fit!
I print in ABS so the components are usually glued to each other with ABS doped acetone. Magnets can be epoxied into place
Fusion 360 Baby! Many, many, hours. Ive done it so many times now I could probably crank out a whole 'nother version in 6-8 hours!